Thursday, July 30, 2015

Grilled Zucchini and Squash

When my parents recently came to visit, they brought a large supply of zucchini and summer squash from their garden, which was nice since our zucchini hadn't ripened yet, and we hadn't planted yellow squash this year.


We decided to marinate and then grill some of the squash. I ended up slicing 2 yellow squash and 1 zucchini for this recipe. For the marinade, I used a recipe that a friend of ours gave to us.

Ingredients
4 Tbsp red wine vinegar
Juice of 2 freshly squeezed lemons
4 cloves of garlic minced
4 tsp fresh thyme leaves (I used a combination of regular thyme and lemon thyme that I had growing in 
   our garden).
2/3 cup extra-virgin olive oil
Salt
Freshly ground pepper
Summer squash and/or zucchini

 Directions
 Slice the squash approximately 1/4 inch thick and lightly sprinkle with salt and pepper.
 Whisk the olive oil, vinegar, lemon juice, garlic and thyme together in a large bowl.
Add the sliced vegetables to a large plastic bag or place in a large bowl.
Cover with the marinade and allow it to marinate at room temperature for at least 3 hours, or refrigerate overnight.
Grill the vegetables on a barbeque over medium heat until tender, approximately 5 to 10 minutes, turning as needed.

This dish can be served warm or at room temperature. I must admit it was great with dinner the night we made it, but I refrigerated the leftovers and ate those at room temperature for lunch the next day, and liked them even more.


~Enjoy~

Monday, July 20, 2015

Marinated Cucumber Salad

Our garden is bursting with a plethora of ripe cucumbers right now, so we are scrambling to use them all. In addition to trying several refrigerator pickle recipes and making some fresh garden salads, I whipped up a batch of marinated cucumber salad this morning. This is a recipe that my mom has made for many years and the beauty of it is its simplicity. You only need a few ingredients and it mixes together quickly. After a few hours of marinating, you are treated to a crisp fresh side dish with your meal.

Marinated Cucumber Salad         


Ingredients:
1 cucmber
1 onion
1/2 cup vinegar
1/2 cup water 
1 Tbsp sugar
1/4 tsp salt

Peel and slice the cucumber and thinly slice the onion into rings and place in a small bowl. Combine the remaining ingredients and stir until the salt and sugar are dissolved. Pour over the cucumber and onion mixture and allow the salad to marinate for 2 hours. Drain the salad and serve.

See, I told you this was a quick and easy recipe! It's a tasty side dish to serve with a meal on a hot summer evening, and a great way to use some cucumbers if many are ripening at the same time. What are some of your favorite ways to utilize the fresh produce from your garden?


Tuesday, July 14, 2015

The Summer Flowers are Blooming

In my last post I brought you on a stroll through our vegetable garden. As promised, today I am going to show you some of the flowers that are starting to bloom throughout our yard this season.
I had trouble capturing a good photo of these beauties, but I still wanted to share them with you as I thought they were rater unique. This is pink lavender. I have had various shades of purple lavender planted in my gardens and in pots on our deck over the years, and I actually planted this pink variety in the yard several years ago. Each season it would turn green but it never bloomed, so I was really excited when the pale pink buds appeared a few weeks ago! Like other varieties of lavender, it smells wonderful, but this color is so unusual. Bees seemed to be really attracted to these flowers and several would be pollinating them at once. With the recent launch of his new business Hexacomb, my son Dave has become very supportive of  working to help sustain the endangered honeybee, as it provided inspiration for the design of his product.Therefore, we were really happy that these pretty  flowers provided another pollination source in our garden for this beneficial insect.


Next, lets take a peek at another summer beauty...


This hibiscus is planted in a large container which we bring inside at the end of the season, as it is not quite hardy enough to survive the NJ winters. Since it has gotten quite large over the years, it is starting to take up a lot of space indoors, but it is worth the effort as it is gracing us with beautiful tropical flowers that are giving the area around our pool a bit of a tropical feel.

This is another example of the flowers that are enhancing our pool area. The aroma of these gorgeous lilies is amazing!


But those aren't the only lilies we have planted near the pool. These beautiful day-lilies  come back every year and provide sunshine yellow color throughout the season...


We also have a large urn near the lounge chairs by the pool that we plant annuals in each summer. This year we planted petunias and I can not even describe how amazingly well they are doing! The photo doesn't really show the size or dimension of this plant, but it is huge! These flowers have actually started to attract some Snowberry Clearwing Sphingidae that I was able to photograph last year, but I haven't yet been able to capture a picture of them this year. You can check out last year's post here if you want to see what they look like. I am still hoping to get some more snapshots of them in the near future as well.

The Spingidae aren't the only visitors that are enjoying our summer flowers....


The Coneflowers or Echinaceas are doing a great job of attracting the butterflies, but the butterfly bush is just beginning to sprout flowers so I can only imagine the amount of butterflies we will attract when that shrub reaches it's full glory.


The black-eyed Susan's or Rudbeckia hirta are just starting to open as well...

il
We are fortunate enough to have eight hydrangea shrubs planted throughout our yard, and I must admit, I am in love with these flowers. We have two shrubs that are a little sparse with their blooms this year, but the other ones are more than making up for them. The range of colors they are producing is great. I have read that you can change  the colors of your hydrangeas by adjusting the pH of the soil, but given the gorgeous array of colors we have, I have no desire to experiment with this technique yet.


 I'll share more of our flower gardens with you as the season progresses, but I hope you enjoyed taking a look at the colors that are starting to enhance our yard so far. What are some of your favorite blooms where you live?

Linking with:
The Enchanting Rose
Cedar Hill Farmhouse
Hope In Every Season 

Monday, July 6, 2015

Stroll Through Our Vegetable Garden

We have had a lot of rain here recently, but I was finally able to capture some photos from our gardens. Would you like to take a stroll through our garden as the birds serenade us this morning? First, let me give you a quick reminder of how this year's garden started. Remember all the seedlings my husband planted and we so gingerly cared for....


Well, they were transplanted to the garden in May after the threat of frost. We didn't have much luck with eggplant last year, and someone suggested that we try planting those in buckets this year rather than directly in the garden soil. We don't know if that will make a difference, but we were willing to give it a try. Dave also made 2 triangular trellises out of wire fencing that he bought at a home improvement store. They work great as supports for the cucumber vines, and as a DIY project they were much less expensive than similar items we had seen in garden catalogs. We put down some black sheeting to help minimize the weeds. Last year we had used a greyish colored one, but we didn't find it to be very effective as the weeds actually grew under the sheeting.  Therefore, we opted for the darker sheets of weed block this year.


In addition to the eggplant and cucumbers, we planted 3 varieties of tomatoes, as well as butternut squash, 2 kinds of lettuce, zucchini, beans, peppers, onions and melons. Every inch of the garden was utilized! One of the raised beds at the entrance of the garden is home to 2 kinds of oregano, 2 kinds of chives, thyme and lemon thyme, which all grow back every year. In addition, we added flat leaf and curly parsley, cilantro, and dill. In the raised bed on the other side of the gate, we planted rosemary and basil...lots of basil because we love making pesto with the recipe I shared with you last year.


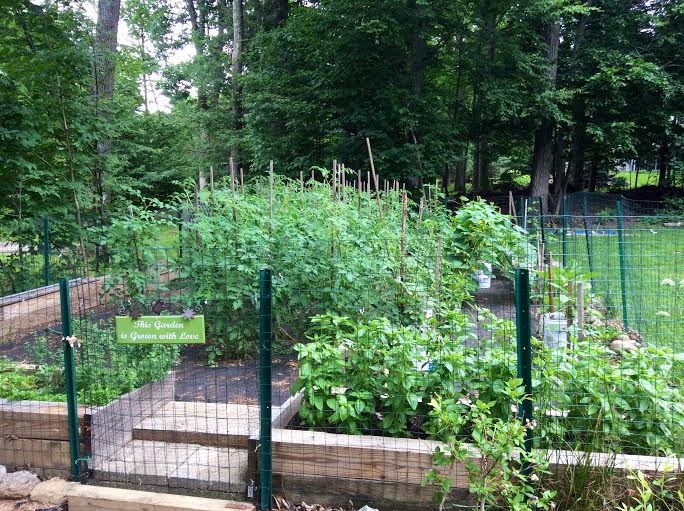
 So are you ready to take a stroll through the garden and see how it is doing today?


Outside of the garden gate on the left, which you can not see in this photo, we have raspberries, blackberries, and some wild berries growing. On the right hand side of the gate we have 2 blueberry shrubs which are still yielding some fruit.


The basil has really taken off so it looks like we will be making lots of pesto, and I have begun looking for some new recipes to try as well.


I've been pinching the tops of the plants when they are getting ready to flower, as that helps the plants grow bushier rather than stalky. I stored the clippings in jars of water until I was ready to cook with them, and look what happened...they grew roots. Well I couldn't let perfectly good plants go to waste, so what's a girl to do? I replanted them in the garden of course! At this rate we will have an endless supply of basil this year, but I am not complaining. By the way, it smells amazing as you enter the garden! Aromatherapy for the gardener's soul.


Some of the tomato plants are now as tall as me, and although none have ripened yet, there are many green tomatoes growing throughout the garden.


Look at how the cucumbers are progressing.....


The butternut squash are blooming and growing like like crazy.


The beans, zucchini and lettuce are doing great...


We've already harvested some lettuce and it looks like we'll soon be having some luscious fresh salads full of other veggies as well!
Thanks for stopping by and taking the tour of our vegetable garden on this gorgeous summer day. On the next round of our garden tour I'll share some photos of the flowers that are blooming around the yard. Until then, remember to take some time to create wonderful seasonal memories with those you care about.
Linking with:
The Enchanting Rose

Friday, July 3, 2015

New Chapters Begin in Our Family Life

When I first started this blog almost 1 year ago, I opted to call it Seasonal Chapters for several reasons. Home and family are very important to me. Living in the northeast, we have the joy of being able to experience the lovely differences that each season has to offer, and I have always enjoyed doing special things that created fun family memories for us during each season of the year. I was in a severe life threatening accident before I started this blog, and it caused me to step back and take a close look at everything that I had to be grateful for, and how it was important to appreciate all of the little moments in life as well as the big events. I also realized that my kids were becoming young adults and I started to reflect on the different chapters that life in general has, and how each chapter is like a season in life. Hence the name and blog "Seasonal Chapters" were born. Although I had read and followed some blogs before, I really didn't know anything about writing one at the time. With the encouragement of my family and a dear friend however,
 I decided to take the plunge and start a blog of my own. There has been, and still is, a lot to learn, but I am enjoying the process and love the friendships I have made along the way.

That being said, June offered some very significant milestones in the chapters of our family story. My parents celebrated their 50th wedding anniversary, and my daughter graduated high school. We are so happy for my parents and so very proud of Pam! I can hardly believe my "baby" will be starting college in the fall. Where does the time go?


Just when I thought we had more than our fair share of happy milestones to honor this summer, my son gave us one more reason to celebrate...he launched his Kickstarter campaign in hopes of getting his business started, and beginning the process of obtaining a patent for a unique furniture design he created!

He creation is Hexacomb, a modular shelving system that uses neodymium magnets to connect the individual shelf "cells" or hexagon units together. It is a furniture design that is sculptural, unique, flexible, and can be adapted to meet your changing needs.

David is about to enter his senior year in college, and is pursuing  a double major in Art and Education at my Alma mater, William Paterson University. His goal is to become an art teacher, but he has also always had the dream of pursuing his own creative endeavors as well.  As an artist, he is gifted in that he has been able to excel with more than one medium and has enjoyed them all...drawing, painting, sculpting, textiles. During his junior year in college he had the opportunity to take a furniture design course with a professor who also happens to own his own company. One of the assignments was to examine a common piece of furniture found in homes and to make it more appealing and practical. From that assignment, the creation of Hexacomb was born. At the urging of that professor, Dave entered his design in the 2015 University Business Competition, and with the help of his girlfriend Lisa, won the contest! With that accomplishment, the spark was ignited and the journey of a new dream had begun. You can view a video of his project here.

With the July 4th holiday upon us, my personal goal is to spend time with my family, reflect again on all that I have to be grateful for, and to look forward to all of the fun memories we will be creating together this summer. I also want to take a moment to say "Congratulations" to Pam and Dave. I am so incredibly proud of both of them and I look forward to watching them become the authors of their own life stories. Their love, hard work, and accomplishments have added great chapters to my personal story, and they have created many amazing memories for me in the seasons of my life!


Thursday, July 2, 2015

Mixed Berry Pie

We are fortunate to have a combination of wild berry bushes as well as berry plants that we intentionally planted in our yard. Each year we anxiously wait for the fruit to ripen.
 
As the berries start to reach maturity, we make a point to check the plants frequently...otherwise we often loose some of the fruit to various garden visitors.
This week we were finally able to harvest a bunch of ripe fruit at the same time, so I decided to make a mixed berry pie. It was scrumptious so I wanted to share the recipe.

Mixed Berry Pie

Ingredients:
~double pie crust (I used Pillsbury refrigerated pie crust for this recipe but you can make one from        scratch if you prefer)
~6 cups of various berries (I used fresh from our garden but you can use frozen, just defrost and then drain them first)
~1 Tbsp fresh squeezed lemon juice
~zest from 1 lemon
~1/4 cup flour
~1/2 cup sugar
~1 egg
~1 Tbsp milk

Preheat your oven to 425 degrees and position a rack in the middle of the oven to bake the pie on (I used a 10 inch pie dish, and my pie did not bubble over, but I have had berry filling drip out of the pie in the past so you may want to slip a baking pan on a lower rack to catch any juice that overflows.)

Line your pie dish with one layer of your pie crust dough.

Combine the berries, flour, sugar, lemon zest, and lemon juice into a large bowl and stir gently until combined.

Pour the berry filling into the bottom layer of your pie.

Place the top layer of crust on the pie, crimp the edges of the two layers together and make 4 slits in the top of the pie so that it can vent while baking.

In a small bowl, beat the egg and milk together and then brush the egg wash on the pie.

Bake the pie at 425 degrees for 20 minutes and then reduce the oven temperature to 350 degrees and bake for another 35 minutes or until the juices are bubbling and have thickened.

Transfer to a wire rack to cool completely before serving.