Today I want to share a project with you that has been a long time in the making. My parents had given my son a beautiful, solid, and well made wooden toy chest for his first birthday. My original intent was to stain it, but it was immediately put into use holding many of David's toys. The staining project was put on hold. Over the years I thought about painting instead of staining it, but since I couldn't decide on a color because the toy box was utilized in various rooms, it remained in it's unfinished raw wood state. It also acquired it's share of nicks and scratches along the way, as it was put to good use by both of our children.
As the kids outgrew the need for a toy box, the piece of furniture was moved to the basement, again with the intent that some day I would finish it. Well, my new found love of milk paint and the variety of ways it can be used, motivated me to pull out the long forgotten toy chest and finally give it the much anticipated makeover it deserved.
.jpg)
.jpg)
.jpg)
.jpg) Unfortunately we don't have a guest room in our house, so when my parents or other family members visit, we end up utilizing an air mattress in the family room to create some additional sleeping space. The refinished toy box is big enough to store the deflated air mattress and linens when not in use. It keeps these items out of sight, and serves as a unique end table with hidden storage. It looks great next to a chair that is in front of our fireplace, and creates a cozy spot to read and sip some tea on chilly evenings.
Unfortunately we don't have a guest room in our house, so when my parents or other family members visit, we end up utilizing an air mattress in the family room to create some additional sleeping space. The refinished toy box is big enough to store the deflated air mattress and linens when not in use. It keeps these items out of sight, and serves as a unique end table with hidden storage. It looks great next to a chair that is in front of our fireplace, and creates a cozy spot to read and sip some tea on chilly evenings. 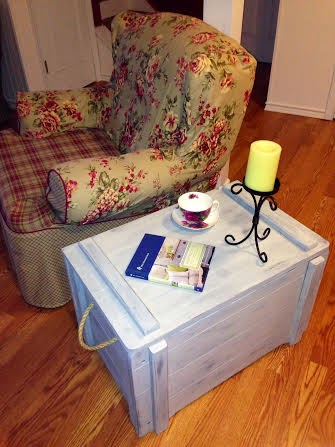.jpg)
.jpg)
By the way, I'm linking this project up with the Pretty Preppy Party this month that is hosted by some great bloggers. Be sure to check out Julie's blog at Less-Than-Perfect Life of Bliss.
She has a really inspirational site with lots of great ideas!
 I'm also linking up with Milkpaint Masterpiece Monday on the Miss Mustard Seed Milk Paint Blog and Furniture Feature Friday on the main Miss Mustard Seed blog. You know how much I enjoy using the MMS Milkpaint products and her blogs have been among my favorites for a long time.
I am also linking up with Finding Silver Pennies. Danielle has a fun blog full of ideas and hosts a great Sunday link party, so grab a cup of tea and go stop by for a visit. And be sure to join Becky at Beyond the Picket Fence for the Vintage Inspiration Party she hosts with 3 other blogs as I will be linking up there as well.
Please come check out the great projects at My Salvaged Treasures as I will be displaying this project there as well.
Please Stop by the Get Your DIY On Blog Party hosted by Mandy at The Hankful House and 4 other great bloggers.

This turned out so cute, Dorene! And I love that it's a meaningful heirloom piece that you can put to good use!
ReplyDeleteThanks Julie!
ReplyDeleteThe chest turned out great! That just may be the solution to my problem. Thanks so much for replying to my question. I'm so glad you did, now I have a wonderful new to me blog to read.
ReplyDeleteYou're welcome! Please let me know how your project comes out.
DeleteBetter late than never, right? What a nice change and a perfect color choice. Thank you for linking up with Vintage Inspiration Party.
ReplyDelete